the greatest skill a woman can learn for herself is self reliance
to clarify … so many strong women in my life rely on men. that dependence is dangerous. ladies here are some good ref resources I’ve found helpful on my journey towards self reliance
If you’ve logged in to Tumblr in the last few days, you will have seen the GDPR warning, telling you Tumblr is part of the Oath family of sites, and requiring you to opt-in to their privacy settings.
You may not have realised that, in contravention of the GDPR rules which ban default opt-ins, if you don’t go into the ‘more options’ button and opt out of each individual sharing partner, Tumblr will share your data with a whole huge list of other companies. Like, 300 of them.
If you’ve already opted in to the Oath privacy stuff, you need to go to your Settings page:
Click the Privacy button on the right:
Then, click the little button next to ‘Cookie Consent’ to revoke it.
After confirming you want to revoke consent, you will immediately be taken to that big privacy opt-in page again. From that point we follow the steps @the-mad-duchess described – first click ‘Manage Options’:
Then, click the blue ‘Manage’ button, and expand the two lists. You’ll see five kinds of data sharing, and like 300 different companies:
The first five you can click manually more easily than using javascript. That might be enough to opt out of any data sharing – but I want to be sure. So, let’s make sure we disable every single enabled partner as well.
However, clicking on 300 little buttons to opt out of is an absurd demand. There is, thankfully, a shortcut, using your browser’s developer tools.
What you want to do is open the web console. In Firefox, you do it like this: click the little menu in top right, then go down to where it says Web Developer:
Then, click the Web Console option:
This will open up the web console in the bottom of the screen. It will have a bunch of messages in it that you can ignore:
As shown, what we want to do is copy and paste some JavaScript code into this, then hit ‘enter’, which will make the browser simulate a mouseclick on every single one of these little buttons and thereby turn them all off. The code is this:
var rows = document.getElementsByClassName("vendor-options")[0].children;
for (var i = 0; i < rows.length; i++) {rows[i].lastChild.firstChild.click();}
If you’re not familiar with JavaScript, let me briefly explain what this is doing. The first line finds the part of the page with all the buttons in it – specifically, the rows in the table of vendors, which is identified by the “vendor-options”. The second line goes through each of them one by one, and for each row of the table, goes inside and finds the button, and simulates a click on it.
If it works correctly, you will abruptly scroll to the bottom of the page and all those little buttons will slide to the ‘greyed out’ position. Now you can go ahead and click Done, click the OK button, and carry on using Tumblr, trusting that if they keep their word, they won’t share your data with those 300 companies.
I’m gonna chat with the New XKit devs to see if this can be added (they may already be working on it). But I hope this saves you some time.
Note also – this is not actually compliant with the new GDPR laws. The rule is that you have to explicitly opt in to letting companies use your data, you can’t have a list of default opt-ins behind a button like this. At some point, somebody will hopefully sue Yahoo/Oath and establish that in court. In the meantime, let’s keep our data to ourselves.
no one tagged me, but i wanted to post six selfies…
that hair… HOW YOU DO THAT HAIR PLZ TEACH
😀
Buckle in, because this is going to be a LONG post. And I’m going to talk about BOG MUMMIES.
For reference, the hair in question:
This updo was actually what convinced me to grow my hair long in the first place (back in ye old 2008), and it has been strongly influential in my personal aesthetic ever since.
The story starts in 1938. Actually, it starts even earlier than that. In ~280 B.C., a woman died, and her body was placed in a bog, where it stayed until it was discovered in 1938, so well-preserved that the hair was still there.
This bog mummy is referred to as the Elling Woman. Here’s a bit about her.
The article talks a bit about her hair, but it’s kind of an unsatisfactory description. I found out about it when the article reached the Long Hair Community Forum in 2008, resulting in a 40-page (and counting!) thread wherein a bunch of long-haired women figured out how to recreate the hairstyle.
The ladies of LHC looked at the images of the hair, and were like: “Yep, that’s a rope braid.” “Here’s how you could do a 7-strand braid with 2-3-2 sections.” Etc. And basically, they tested out different versions, and came up with something that was cool-looking, comfortable, and practical.
Here’s the ~official~ reconstruction on the Tollund Man website:
And here’s a (very confusing) diagram of how the style is supposedly constructed:
There are several different recreations of the style floating around the LHC and youtube and the wider internet. The style also looks and works differently with different types of hair. I had to grow mine out until I could make a waist-length braid before I could really successfully do it with my hair, but my hair is medium-thick and fairly fine, so YMMV. Some people on the LHC did it with much shorter and thicker hair.
The LHC thread about it is a fun read, but it’s a bit long and meandering, and there are several conflicting sets of instructions there, so I’ll just talk about the method that I use. If you want a video aid, what I do is basically this, except I do rope braids for the bottom 2/3s instead of English braids, and I finish it by wrapping the thick braid around the middle braid, like this (I’ve never actually tried that particular method for forming the big braid, but finishing up the bun is the same).
Here’s a written description:
Take the top 1/3 of your hair and braid it in a basic 3-strand braid (a.k.a. an English braid) down to a little past your neck. Tie it off so that it stays braided while you braid the rest of your hair.
Separate your remaining hair into two sections (each about 1/3 of your total hair), one on the left side, and one on the right.
Braid each section into a rope braid (a two-strand braid that’s made by twisting both sections in the same direction, then twisting them together in the opposite direction). Tie them off so that they stay braided. Also, I’ve found that it’s better to make the rope braids so that they’re coiled in opposite directions.
Take the two rope braids, and braid them with the top/middle section of your hair that you’d braided into an English braid. You’re basically making one big English braid. After I’ve started braiding it, I slip off the elastic tie that I’d used to hold the middle braid together temporarily.
Braid it as a 3-strand (that’s made up of two 2-strand rope braids, and one one-strand section that started as a 3-strand braid, so it’s sort of a 7-strand braid!) English braid all the way to the end of your hair. Take out the elastic ties around the two rope braids when you get to them.
Tie the whole thing off with a single elastic tie at the end.
To make the bun, you lift up the simple English braid (the one you made in step one), and you wrap the thick, complicated braid around it in a spiral.
Tuck the end in as best as you can, and then secure it with whatever you want. I’ve used everything from a hair stick, a hair comb, a few bobby pins, and even a single barrette before.
You’re done!
There wasn’t any evidence of any hair pins or anything like that to secure the hair found with the Elling Woman’s body. If your hair is very oiled and/or very unwashed, it might be able to hold itself in place without needing to be tied or secured. As it is, this style does work better if your hair has been oiled, or hasn’t been washed for several days.
This hairstyle is really cool for a lot of reasons, but it’s also extremely comfortable! The middle braid essentially holds the whole thing up, so you don’t experience any of the pulling you feel with some buns.
Basically, if I had to wear the same hairstyle for thousands of years, I’d definitely pick this one. It’s beautiful, versatile, comfortable, and has a really cool backstory.
This must be the most beautiful DIY tutorial I have ever seen. And it so happens to be in style of this weekend. Found on Ulicam, a very nice blog by Ulrika Kestere, photographer and illustrator. For the whole tutorial and lot’s of inspiration, click here.
Heyo! This is a masterlist that I’ve compiled to help my fellow Tolkien writers/creators. A lot of us have done a lot of research to create our settings, and I wanted to put all the awesome resources I’ve found over the years into one place. Voila~
I’m always excited to see new things that might be useful for writers working within Tolkien’s setting. Let me know if you spot something useful!
This is amazing! Thanks so much for compiling, @heckofabecca!
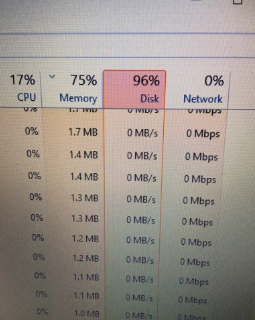
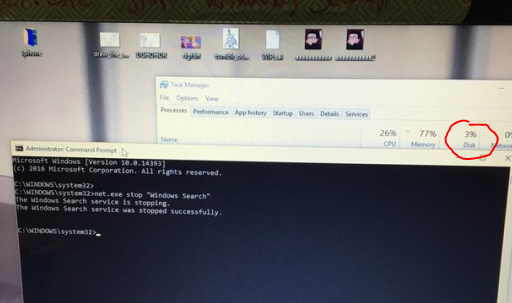
y’all didn’t even add a tutorial of how to do this so imma put one right here
1. type in cmd.exe into your windows search and right click on Command Promt search result and select “Run as Administator”. 2. Type/Copypase in
net.exe stop “Windows Search” and make sure Windows Search is in quotations. It should then respond saying “The Windows Search service is stopping” and then tell you it’s stopped.
This is only a temp fix though, if you want it switched off permanently then do THIS:
1. Press the Windows key + R at the same time and type in services.msc.
2. Scroll until you find Windows Search and double click it to enter its Properties window.
3. Change the Startup type to Disabled. Apply this change and you can exit out.
VOILA, NO MORE TAKEN UP DISK SPACE
Reblog to save a life
HOLY SHIT IT WORKS
My computer is brand fucking new and I couldn’t figure out WTF its deal was! Thank you!