The other day I came across this awesome program by accident
(I don’t even remember what I was actually searching for, but on the several
times I’ve looked for a program like this I’ve had no luck). It’s cool enough that I wanted to share it.
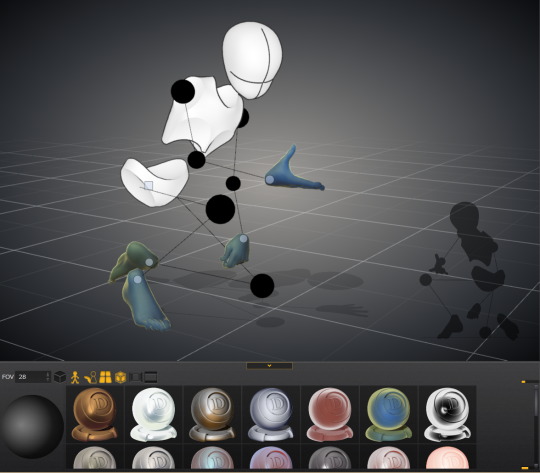
It’s called DesignDoll (website here) and it’s a program that lets you shape and pose a human figure pretty much however you want.
There’s a trial version with no expiration date that can be
downloaded for free, as well as the “pro license” version priced at $79.
I’ve only had the free version for two days so far, so I’m not an expert and I
haven’t figured out all of the features yet, but I’ve got the basics down. The
website’s tutorials are actually pretty helpful for the basics, as well.
Here’s the page for download, which has a list of the
features available in both versions.
There are three features the free version doesn’t have:
Can’t save OBJ files for export
Can’t download models and poses from Doll
Atelier (a sharing site for users; note that the site is in Japanese, though)
It can’t load saved files
The third one means that if you make a pose, save it, and
close the program, you can’t load that
pose/modified model later. You have to start with the default model. I
found that out when I tried to load a file from the day before (this is why
reading is important…). Whether saving your modifications (and downloading models and poses) is worth $80 is up to you.
But, the default
model is pretty nice and honestly if all you’re looking for is a basic pose reference
it should work fairly well as it is. Here’s what it looks like:
There’s a pose tag
that lets you drag each joint into place and rotate body parts. The torso and
waist can be twisted separately, and it seems like everything pretty much
follows the range of movement it would have on an actual human.
Even the entire shoulder area is actually movable along with the joint! See, like how the scapular area of the back raises with the arm:
The morphing tag
is one of the coolest features, in my opinion. It lets you pick and choose from
a library of pre-set forms for the head, chest, arms, legs, etc. It has some more realistic body shapes in addition to more anime-like ones. Don’t like the
options there? Mix a few to get what you want! Each option has a slider that
lets you blend as much or as little as you want into the design.
So you, too, can create beautiful things like kawaii
Muscle-chan!!
The scale tag
lets you mess with the proportions and connection points of different joints. This
feature combined with the morphing feature not only allows more body shape
variations, but it also means that you can do things like make a more digitigrade
model if you want. (The feet only have an ankle joint, but for regular human poses that’s all that you really need, so whatever.)
Or you can make a weird chubby alien-like thing with giant
hands and balloon tiddies if that’s more your thing.
The ability to pose
hands to the extent it allows is far more than I could have hoped for from
a free program. Seriously, you can change the position of each finger joint individually, as well as how spread out the fingers are from each other. Each crease on the diagram below is a point of movement, and the circles are for spread between fingers.
And to make it a bit more convenient, there’s a library of pre-set hand poses you can pick from as well, and then change the pose from that if you like.
In both versions, you can also import OBJ files from other places for the model to hold, like if you wanted to have them hold a sword or something.
Basically, this program is awesome and free and you should
totally check it out if you want a good program for creating pose references.
I just wanted to add a little more to this. If you have trouble figuring out how light sources work in your drawings this also allows you to choose where to have a light source.
That shaded ball on the left is your light source. You can see how moving the point changed the shadow cast.
Oh and all those other nifty looking things in that bottom bar there, yeah it’s what you think. You can change the model color to one of these presets or even customize your own palette.
Plus for all you lovely people who want something a little more simplified to use as a pose reference
You can turn your model into the classic wire frame.
Why reblog this? Because for more visual creators, this will be like the lumberjack discovering chainsaws. “Reblog to save lives” as the saying goes.
Note however that this program doesn’t work for a Mac OS. As I found out.
Ok, I see that you are a bit lost so here is what I can tell about getting used to your palette:
1) The driver
Before using your tablet, you have to install a driver. Is your driver correctly installed? That’s what you should see when you open Photoshop and use the default set brush. I also used the most common brush on the right of the pic:
I’m telling you about the driver because when I was a newbie, I worked during almost one year and a half with a driver that wasn’t correctly installed. I had no pen pressure and no brush dynamics. Don’t ask me how I was even able to WORK with those settings but I didn’t ask myself the question until I saw a tutorial and I was like “Hey, wait a minute…”
2) The position of the tablet
You have several ways of positioning the tablet when you draw. Some people put it right in front of them, some other like me, on the right of the computer or even on the left for the left-handed people.
You have to decide what is more convenient for you. You problems are maybe due to the way you position your tablet or the way you hold your stylus.
3) Rome wasn’t built in one day.
Ok, if what you draw still looks like the drawings of a six years old, it’s maybe because you are lacking practice. What is obvious and very natural to some people can be hard for some others. Carry on practicing and you’ll get results soon! ^^
4) If everything is lost, you can still follow these tuts:
For artists who have problems with perspective (furniture etc.) in indoor scenes like me – there’s an online programm called roomsketcher where you can design a house/roon and snap pictures of it using different perspectives.
It’s got an almost endless range of furniture, doors, windows, stairs etc and is easy to use. In addition to that, you don’t have to install anything and if you create an account (which is free) you can save and return to your houses.
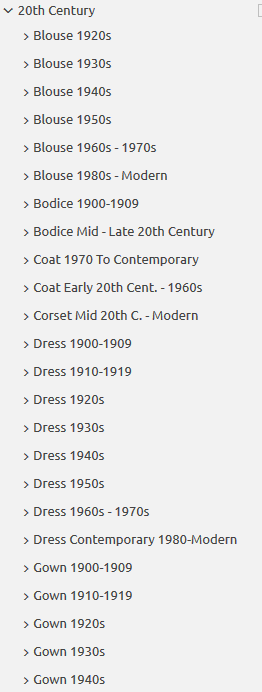
Do you design a lot of characters living in not-modern eras and you’re tired of combing through google for the perfect outfit references? Well I got good news for you kiddo, this website has you covered! Originally @modmad made a post about it, but her link stopped working and I managed to fix it, so here’s a new post. Basically, this is a costume rental website for plays and stage shows and what not, they have outfits for several different decades from medieval to the 1980s. LOOK AT THIS SELECTION:
OPEN ANY CATEGORY AND OH LORDY–
There’s a lot of really specific stuff in here, I design a lot of 1930s characters for my ask blog and with more chapters on the way for the game it belongs to I’m gonna be designing more, and this website is going to be an invaluable reference. I hope this can be useful to my other fellow artists as well! 🙂
In Islamic culture, geometry is everywhere. You can find it in mosques, madrasas, palaces and private homes. This tradition began in the 8th century CE during the early history of Islam, when craftsman took preexisting motifs from Roman and Persian cultures and developed them into new forms of visual expression.
This period of history was a golden age of Islamic culture, during which many achievements of previous civilizations were preserved and further developed, resulting in fundamental advancements in scientific study and mathematics. Accompanying this was an increasingly sophisticated use of abstraction and complex geometry in Islamic art, from intricate floral motifs adorning carpets and textiles, to patterns of tile work that seemed to repeat infinitely, inspiring wonder and contemplation of eternal order.
Despite the remarkable complexity of these designs, they can be created with just a compass to draw circles and a ruler to make lines within them, and from these simple tools emerges a kaleidoscope multiplicity of patterns. So how does that work? Well, everything starts with a circle. The first major decision is how will you divide it up? Most patterns split the circle into four, five or six equal sections. And each division gives rise to distinctive patterns.
There’s an easy way to determine whether any pattern is based on fourfold, fivefold, or sixfold symmetry. Most contain stars surrounded by petal shapes. Counting the number of rays on a starburst, or the number of petals around it, tells us what category the pattern falls into. A star with six rays, or surrounded by six petals, belongs in the sixfold category. One with eight petals is part of the fourfold category, and so on.
There’s another secret ingredient in these designs: an underlying grid. Invisible, but essential to every pattern, the grid helps determine the scale of the composition before work begins, keeps the pattern accurate, and facilitates the invention of incredible new patterns. Let’s look at an example of how these elements come together.
We’ll start with a circle within a square, and divide it into eight equal parts. We can then draw a pair of criss-crossing lines and overlay them with another two. These lines are called construction lines, and by choosing a set of their segments, we’ll form the basis of our repeating pattern.
Many different designs are possible from the same construction lines just by picking different segments. And the full pattern finally emerges when we create a grid with many repetitions of this one tile in a process called tessellation.
By choosing a different set of construction lines, we might have created this any of the above patterns. The possibilities are virtually endless.
We can follow the same steps to create sixfold patterns by drawing construction lines over a circle divided into six parts, and then tessellating it, we can make something like the above.
Here’s another sixfold pattern that has appeared across the centuries and all over the Islamic world, including Marrakesh, Agra, Konya and the Alhambra.
Fourfold patterns fit in a square grid, and sixfold patterns in a hexagonal grid.
Fivefold patterns, however, are more challenging to tessellate because pentagons don’t neatly fill a surface, so instead of just creating a pattern in a pentagon, other shapes have to be added to make something that is repeatable, resulting in patterns that may seem confoundingly complex, but are still relatively simple to create.
This more than 1,000-year-old tradition has wielded basic geometry to produce works that are intricate, decorative and pleasing to the eye. And these craftsman prove just how much is possible with some artistic intuition, creativity, dedication along with a great compass and ruler.
It seems like all of the resources I can easily find online for identifying wolves vs dogs are either massive and difficult to understand without prior knowledge of the subject, or extremely bare-bones and miss a lot of key information. I tried to hit a comfortable middle-ground. (sorry if it’s a little wordy) This tutorial is made as a reference for drawing, so everything but purely visual differences between dogs and wolves have been left out.
I’ve been wanting to make this for a while now, so I’m glad I finally sat down and did it!
**EDIT** When it comes to the section on wolfdogs, please take it with a grain of salt. With something as complicated as genetics, they are of course, not going to be as simple as I make it seem. What features different levels of content can display, and even which percentages designate which levels of content are often hotly debated within the wolfdog community. At this point I’ve elected not to change the image set itself because: a. it’s a huge pain in the ass b. this is a tutorial for beginning artists. It’s meant to be a hugely simplified version of the topic, and I’ve stated clearly that it is NOT to be used in real-world identification.
**EDIT 2** A couple people have noted that the puppies section is a little misleading. Wolf puppies will always be born a solid brown, but that brown can range from a very dark brown (appearing as black) to a llight, gray-ish brown. The important point is that wolf pups will always be a solid colorwith even less distinguishable markings than even adult wolves. (also this guide does not include color possibilities related to birth defects or other genetic anomalies such as albinism)
((Huge thanks to yourdogisnotawolf. who’s blog inspired me to make this and for digging up that amazing picture of the wolf/lab mix))
(model, cosplay , game designer, costume design for lots of chinese series full of talents…Gong 3, Palace, Yun Zhong Ge, Return of Condor Heros 2014, Swordman 2013…)